Serves: 8-10
Cost: ~€5.50 – €8 depending on the season, brands used and so forth
Preparation and cooking time: ~40 minutes preparation and 100 minutes total cooking
Calories: ~560 calories a slice, if divided by 8
Allow me to start the post today by telling you a story of something that happened a long time ago, in a galaxy far, far away. Ok – it wasn’t that long ago…, only three decades, and by “galaxy” I actually mean country, and it wasn’t even so far away – more like 410 kilometres, as the crow flies – give or take a few. But thirty years ago today something amazing happened – something that would alter the course of the very fabric of nature itself. Something that would impact hundreds of people in unimaginable ways. Yes – you wouldn’t even be here reading this right now were it not for this momentous occasion. Yep – before I make it sound too grandiose, the “magical” event was in fact my birthday, for today I turn 30. Today, my friends, I become a man!
In honour of the occasion I’ve even had my mother pick out some photos of me when I was younger. My father dutifully scanned them and sent them over to me and so, since you only turn 30 once, and in celebration of me being alive for 10957 days so far, here are a couple of photos of yours truly (please excuse my awesome haircut in the later one!). As you can see, I started off my life with a funny little mohawk-style.

This is me again, probably around the same age as my son William is now, Chilling out in the sun, shooting the breeze :).

Once I hit “toddlerdom” I think I was actually pretty darn cute… then I got a bit older, and I’m not quite sure what happened after that. I always thought I looked a bit like a potato with a space-helmet on, but my mother always claimed I looked “lovely”, and everyone knows that “mother knows best”, right?! On the right in this picture you can see me looking all smart for my first day at my new school. I think I was around 11 here, and yeah – that is a briefcase, because I was just that cool!

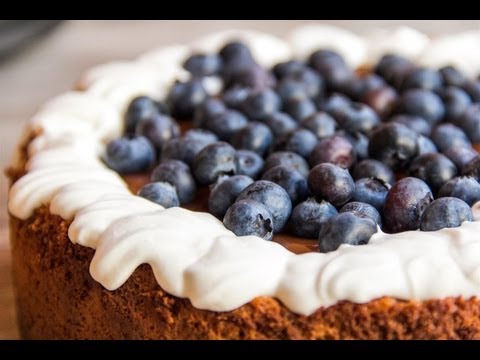
Given the timing of this post, it wouldn’t have been feasible to post my actual birthday cake today, so the cake will be coming later, hopefully. Today though is something which I made last weekend which is the perfect thing to enjoy for a celebratory meal. Inspired by my last baked cheesecake post I decided to take it up a notch and make it a wee bit more exciting. I didn’t top the last one with anything and – well…, let’s face it: cheesecakes need a good topping. A delicious puddle of sweet, tooth-melting caramel, blueberries, and whipped cream ought to do it. Not to mention the strawberries which I substituted in for the cherries in the cheesecake itself.

I usually make my cheesecakes in a much shallower, wider pan and was rather concerned about the cooking time of this one. I made a much deeper cake then normal, using a tin with a 20cm diameter. As a result, after the usual 45 minutes cooking the cake was still very “wobbly”. I had to continue baking it for a full 30 minutes more., and I was very concerned the cake would become dry after the longer cooking time, but in the end I need not have worried and it really turned out rather well.
I recently went on an outing into Paris in the evening to take some photos which I’ll share with you all soon, but in the meantime, I hope you all have a good day – I know I will – and I’ll be back in a few days :).
Strawberry, Blueberry, and Caramel Cheesecake
[learn_more caption=”Video Recipe”]
Ingredients

For the cheesecake
- ~340g Oreo Cookies, or similar dark sandwich biscuit
- 70g Butter
- 600g Cream Cheese
- 100ml Cream
- 2 tbsps Plain Flour
- 150g Caster Sugar
- 3 Eggs
- 250g Strawberries
For the topping
- 80g Sugar
- 100ml Cream
- ~25g Salted Butter
- 100ml Whipping Cream
- ~100g Blueberries
You’ll also need
- A 20cm cake tin, with removable bottom
- An Electric Whisk
Instructions
- Start off by preheating the oven to 180 degrees Celsius, and then separate the Oreo Cookies into two halves and discard the cream filling. Crush the cookie halves into a fine crumb and then melt the butter in a small pan or the microwave and pour into the crumbs. Mix well until it clumps together easily.

- Press the crumbs into the base of your 20cm cake tin, pushing down firmly with a flat-bottomed implement, such as a glass to ensure everything is well packed. Place the tin into the preheated oven and bake for 10 minutes, to set the base.
- Using an electric whisk, whisk together the cream cheese, eggs, and flour in a large bowl. Add in the sugar and the cream and continue to whisk for another couple of minutes. In a smaller bowl, crush the strawberries roughly with a fork and add them to the cream mixture in the large bowl. Pulse the mixture for a few seconds with the electric whisk to ensure even strawberry distribution and then pour the mixture into the tin, directly on top of the biscuit base.
- Bake in the oven for about 90 minutes, until the cake is starting to brown and crack a little on top. The cake should still be a little “wobbly” when hot, but will firm up as it cools. Once done, remove from the oven and allow to cool in the tin. Meanwhile, heat the sugar for the topping over a gentle heat, stirring periodically, in a small pan. Keep stirring and heating until the sugar has completely melted and then gently pour in the cream. This will cause the contents of the pan to froth up so you may wish to temporarily lift the pan away from the heat at this point. Once the cream and sugar have been completely mixed together remove from the heat. Add in the butter and stir until completely melted. Once the cake has cooled pour the caramel sauce over the centre of the cake, leaving a border at the edge.
- Whip the cream until very stiff and pipe, or spoon, around the outside edge of the caramel sauce in the centre, and finally decorate with the blueberries, by dropping them into the caramel. You may wish to complete this last step the next day, once the caramel and cake have completely cooled. Once the blueberries are on, slice the cake and enjoy! 🙂


Happy birthday, love! I’m very happy to have spent 2408 of those days in your very fine company! <3
Thank you Wifey dear 🙂 <3
Charles, you and Wifey are adorable, especially with the addition of William! Keep up the good work. Your cheesecake looks wonderful. I’d add it to my queue, but I’m really trying to “watch it” a bit just now.
Happy, happy, happy birthday Charles! I do hope you did something extravagant for your benchmark birthday! JT threw me a lively surprise birthday party at our friends place with a pool. I had no clue! It was such fun. I can hardly wait to see what he is going to do for the next one!
Yes, one can see the resemblance to William in the baby photos and what a cute photo of yourself at eleven!
Now that’s a birthday cake! And as I’m sure that it was extremely tasty as awesome as it looks. I love that it’s thicker too, a real New York style cheesecake.
Thank you Eva! Something extravagant? Well… I took a half day off, I decided against making a cake because I’m trying to lose weight (I had a small cupcake) and I ate so much at lunch that I didn’t even want dinner – haha! Aside from that it was fairly quiet, but it was nice… surrounded by my nearest and dearest :).
Glad you like the look of the cake!
Happy birthday Charles! Enjoy this day and that ridiculously small cupcake )
Thanks Marianna ;). The tiny little cupcake served me well on that day – just a nice little amount of sweetness and not too many calories! 🙂
Happy 30th Charles. What a big year you’re having. Thirty is a huge milestone and I certainly wish I was back there! You were so cute as a baby but you look like you were a big baby and William does seem to take after you! What a gorgeous looking cheesecake. I’ve seen quite a few recipes lately that all ask for crushed Oreo biscuits. You’d think by now the company would have cottoned on and started selling them in halves, without the cream! xx
Hi Charlie, thanks a lot! Glad you liked the photos! The cheesecake was very tasty… I think Nabisco will never sell Oreo cookies without the filling, sadly… which is a shame. I hate the things… they’re the most filthy, artificial-tasting junk I ever had, but I’ll be damned if they don’t make a good cheesecake base!
You mean you didn’t know that Christie sells the Oreo cookie crumbs like they sell the vanilla wafer version? 🙂 No work involved. Just open the box and cut open the bag inside.
http://www.canadianfavourites.com/Christie_Baking_Crumbs_Oreo_400g_p/christie068.htm
Happy 30th birthday, Charles. Nice photos. You looked very geeky at 11. Have a great celebration today.
lol, thanks Norma 🙂
Happy, happy, happy birthday Charles! The big 3-0! I think you’re going to love your 30’s. So far I have – even more so than my 20’s. 🙂 I love the pictures of you as a baby/toddler and child. The brief case is just awesome! You look very Alex P. Keaton. (Family Ties TV series) 😉 I hope you had a fabulous day and that your year is full of fun, good eats and laughter. I might even be tempted to try this cheesecake even with the oreo crust. Cheesecake is a weakness of mine – especially when combined with berries. It’s a killer combo. 🙂
Hi Kristy, thanks a lot 🙂 Sometimes I feel so old, lol, but then I look “within” myself and actually feel so childish and young! I can’t believe in 6 years I’m going to be TWICE as old as people starting University!!! Yikes!
Happy Birthday Charles!!!!!! =)))
So what are you up to today on this special day? Thanks for sharing your family photos. haha potato with a space helmet. ^.^ I agree with your mum u looked cute.
nice Idea with the oreo cookie base and anything with blueberries must be good anyway.
I wish you a happy year to come and all the best in your life my friend. =)
Hi Helene – the day was actually pretty quiet… I worked in the morning, took half a day off and spent it with my wife and son! Nice and relaxing… even took a nap in the afternoon! Haha, I live life hard!
Happy 30th birthday, Charles. You were a cute little boy and I think you’ve turned into the cliched “fine figure of a man”.
And you can bake cheesecake too. 🙂
No kidding … that is one amazing confection. I hope you have a wonderful day of celebration and that this year just brings you more good things though what can top your lovely family and the friends around you and out here in the electronic ether? I wish we could be gathered around celebrating your special day with something as delicious as this cheesecake. I’ll have to raise a virtual glass of champers in toast … happy 30th and many more, Charles.
Hi A_ – I must admit, I was slightly inspired by the cheesecake you made a while back with the lovely looking caramel lattice on top! Really wanted to do something with caramel, but wanted to add fruit too! :). I wish we could all meet together – wouldn’t it be so much fun? Kind of a shame that we all know each other like this and the probability that we’ll actually meet the other people is virtually nil! 🙁
Thanks for the mention but I know I stole the decorating/combination idea while surfing pumpkin cheesecake “images” on the net. 🙂 By the way, my mom also made my brother and my birthday cakes by hand and once we were in our teens we were so embarrassed by that fact (our friends’ moms BOUGHT theirs) that we insisted our mom did as well. I think I still have an old b&w picture of one of those cakes and a gawky me dancing somewhere.
Happy Birthday Charles. I hope you enjoy your special day…you certainly did give us a special cake.
Thank you Karen 🙂
Happy Birthday, young man! You’ve had quite the year it sounds like, and I hope you have a fantastic day filled with wonderful surprises and fun. What great pics of you, and yes I do see the resemblance with William. That is a truly magnificent cheesecake with all those goodies rolled into one package. 🙂
Thanks Betsy – here’s to many more, watching my little son grow up 🙂
Charles, I’m so happy you were born 30 years ago today! What a lovely montage you have put together and a nostalgic one too… Mother does indeed know best! ;-). A magical post and I love how you celebrate birthdays with homemade cakes in your home… This cheesecake (although not the actual birthday cake I understand), is a total showstopper. Truly extraordinary Charles! (fabulous clicks too). I hope you are having a splendid day surrounded by those you love most. Thinking of you Charles – Happy 30th Birthday!! :).
Thanks Kelly – you know, when I was growing up my mother always made a cake for our birthdays. I used to look at the parents of friends who were buying their cake and feel really … I dunno, “shocked” I guess. I think I’d always assumed that birthday cakes were made by hand at home. It seems not so common these days, but I hope we can always do that for William, and any other brother or sister he may have one day 🙂
Happy birthday! I love oreo crusts…so chocolatey and yummy. 🙂 This cheesecake sounds fantastic!
Thanks Sara 🙂 The cheesecake was really nice… the caramel on top was the perfect addition I think!
Dear Charles, May this day will be the happiest with many more to come! Happy Birthday! Your mother is absolutely right, you do look lovely on every photo, and now too. 🙂 I wish you a lovely time with your family while we, your friends, enjoy this cake… 🙂 I wish your Wife to spend another happy 365000 years with you! 🙂
Haha, thanks Marina – I never thought I looked particularly good as a kid, but I can see my “boyish charm” now that I’m older 😀
Happy Birthday Charles! Hope you had a wonderful birthday! How brave of you to share your baby and kid pictures. Love the briefcase! 🙂 What a way to celebrate a Bday with that delicious cheesecake! Strawberries AND blueberries AND caramel! OMG! Caramel! What a great cake!
Hi MJ – I can’t believe I used to have a briefcase – haha 😀 Loads of kids in my class had one… it was the “in” thing to use 😀
Happiest of birthdays to you, Charles! Your pictures made me smile and your cheesecake looks like pure decadence – the perfect way to celebrate! 🙂
Thanks Laura – glad I could bring a smile to your face 🙂
¡Cumpleaños Feliz! what a year you are having 🙂 Another stunning recipe and you didn´t look like a potato with a space helmet on..brilliant!
Thanks Chica! I totally do look like a potato, but it’s very kind of you to say 😀
Happy belated 30th.
Thats a big briefcase. What was in it, apart from lunch and a few books? How life has changed. You carried a briefcase to school, now those are out of fashion and these days we use bags similar to school bags
Hi 3C – actually we got lunch from school so all I stored in there was books, homework, pens and stuff. They were really in fashion in my school back then – lol!
i think the oreo cookie base just about sums up this dessert- INCREDIBLE
Thanks a lot KB 🙂
oh happy birthday Charles!!!
That you sneak this news in with a rather yummy looking cheesecake is forgiven.
All the very best for you 3!
About the pear bread: it was 3 real pears. Found the recipe on a blog I follow regularly, but it was unfortunately an unmitigated disaster.
Maybe you have time, now that you’re with the 3 – hahahaha – to make a nice pear bread…
Kindest regards,
this non-blogging follower
Veronica
Hi Veronica – thanks for dropping by and your well wishes! I’m intrigued by this pear bread… I think I might actually try and make one myself soon because I’m really very interested to see if I can come up with something “passable” :D. Expect updates “soon”! 😀
Hi Charles,
Belated Happy Birthday!
What an amazing cake! I love the oreo base. Boy, I can finish this whole cake by myself.
Thanks so much Asmita 🙂
A very Happy Birthday to you Charles!!
Those pictures are really very cute and just the way your son looks 🙂
The word caramel always makes my ears and tastebuds tingle with joy. What a gorgeous cheesecake and perfect for the celebration!
Hi Malli, glad you liked the photos – it’s so strange, seeing the similarities, but at the same time he’s his own little guy 🙂
Happy Birthday, Charles! And sorry for being so late to wish you all the best. 30? Wow! You are young 🙂
Thank you for sharing with us these wonderful photographs from your childhood period. I agree with Kelly that this post is magical. I bet that, just like me, now everyone here feels as is they had known you forever. The cake looks so extraordinary, it seems almost unreal! (Where did you find fresh blueberries???). The Oreo topping makes a very dramatic effect. You have certainly merited such a gorgeous sweet treat on your 30th birthday!
Thank you Sissi – no worries, I’ve been a bit behind with my blog-following, so I know the feeling 🙂 I’m so glad you enjoyed the photos! They had blueberries in the local supermarket actually… I was really surprised. They were delicious too – not at all sour. They had fresh redcurrants as well… very strange fruits for winter 😀
How did I miss your birthday? So sorry and I know it was a festive event.
The photos are so cute and I agree with your mother 100%.
You could serve me this cheesecake for every birthday and I’d be a happy woman.
Thank you Maureen 🙂 Revisiting this post now is making me want the cheesecake again right now… Bad Charles! Must not succumb!
Happy Birthday Charles! The world is a very special place with you in it and your delicious recipes. I would think that the calorie intake per slice will be a tad more as I am sure this would only serve 4 hungry teenagers or 8 adults. Have a super day. BAM
Aw, thank you Bam 🙂
Hi Charles, Happy Belated Birthday. Your cheesecake look awesome, great combination. I like your baby photos, you look so cute. And you sure look cool at the age of 11th. 🙂
Have a great weekend,regards.
Thank you Amelia – I certainly didn’t think I looked cute back then, but now I can see that I looked ok in a dorky kind of way 🙂
Happy belated 30th Charles! Hope you get everthing you wish for. I bet this cheese cake tastes great with the Oreo crust,
Thank you Lisa – I wish for nothing more than my wonderful wife and cute little son and for us all to be happy together! 🙂 So far so good 🙂
I’m so sorry to be here late, Charles. So much going on right now. 🙁 Happy belated birthday!! I wish I was 30… From that time I don’t recall how I turned 36. When a child/children are small, somehow those years go by so quickly! So enjoy being 30 now and soon you start to forget your age. LOL!
I love this oreo cookie base cheesecake! How gorgeous!!! Very special cake and I’m sure it didn’t last too long! Hope you had a fabulous birthday!
Hi Nami – the last few years have flown by for sure. I’m hoping it will slow down a bit to give me a chance to enjoy my son’s early years! 🙂
Wow!
What an awesome cheesecake. I was going to make the below version but I think I will attempt your version instead.
http://www.wascene.com/food-drink/new-york-cheesecake-recipe/
Many thanks,
Jen
Hi Jen – the version you linked looks great too, but let me know if you try mine.. would love to know what you think 🙂
Nice recipe!Looks wonderful! Now I have to see the triple chocolate truffle torte video next! Your blog is like endless treasure hunting!
Haha, thanks! That 3x chocolate torte… (not even sure if it is a torte, but that seemed like a good enough name) is just “omg”! :D.. definitely eat with berries though, otherwise it’s super rich!